Estaba un cable seccionado del todo (me ha costado encontrarlo),…Que manitas que eres .
Gracias.
…y otro en camino


Estaba un cable seccionado del todo (me ha costado encontrarlo),…Que manitas que eres .
Gracias.
Creo que el conector de los brazos hidráulicos se encuentra detrás del embellecedor de techo (en el lateral), en inglés "moulded headliner".Buenos días.
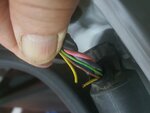
A mi tambien me acaba de pasar este fallo del accionador del maletero, en mi caso es el derecho, un cable cortado.
He analizado por qué ha ocurrido esta avería y he llegado a la conclusión que la solución de la soldadura es temporal porque los otros 3 cables que forman parte de la información están marcados a la misma altura aproximadamente, estos deben de ser pertenecientes a algún tipo de encoder, por eso son más finos que los de alimentación.
Por esta razón, me gustaría poder quitarlos y repararlos en casa pero no sé como quitar los paneles interiores necesarios para descubrir los conectores.
Hay un panel que cubre toda la ventanilla trasera y que imagino que debajo están el dichoso conector.
¿Alguien sabe como se quita este panel? Imagino que va apresión porque no se ven tornillos.
Mi idea es cambiar estos 4 hilos y sustituirlos por cable ultraflexible con aislamiento de silicona y olvidarme para siempre de esta avería.
Saludos y buen fin de semana


Pues igual que yo,…Buenos días
Dave, muchas gracias por la información, aunque está un poco complicado de entender, no por el idioma, sino por las propias instrucciones.
Tal y como están, parece que indica que para quitar el panel que esconde el conector de los actuadores haya que quitar el techo, el lateral interior del maletero y el panel de la puerta. Pero me pongo a buscar acceso a esos pasadores y tornillos y no se encuentran por ninguna parte.
De todas formas no he mirado bien detenidamente, me urgía mucho mas hacer que el actuador funcionase y he soldado un cablecito para solucionarlo y ya funciona bien. Ya sé que es muy temporal, pero necesito que funcione ya e intentaré dejarlo perfecto en unos días. Pasaré fofos si consigo cambiarle los cables al actuador.
Por cierto, ¿alguien tiene uno de estos actuadores rotos para abrirlo y estudiar como repararlo?
Gracias
Saludos


Eso lo sabemos, somos hermanos, casi gemelos y la información fluctúa por ambos foros como si fueran vasos comunicantesHay que tener en cuenta que los Ateca y los Karoq se fabrican en las mismas líneas de producción y en las mismas fábricas, de hecho, si no ves el logo del coche estando dentro, no sabes si estás en un Ateca u en un Karoq. Con esto quiero decir que muchísimas de las soluciones en los Ateca son aplicables a los Karoq y viceversa.
Saludos
Parecen quemados en el corte, no?, habrá hecho algún corto o algo?La Conexión del Brazo con los cables es así:
Ver el archivo adjunto 34292
Ver el archivo adjunto 34293
Ver el archivo adjunto 34291
No son fotos mías,... solo era para enseñar un detalle de la conexión.Parecen quemados en el corte, no?, habrá hecho algún corto o algo?
 .
.
 .
.Solo es empalmar 2 cables.Dave, ¿Podrías poner fotos de como lo hiciste y como quedó?
Y no has hecho brico?Solo es empalmar 2 cables.


