Headlight
1.1 Assembly overview - headlight
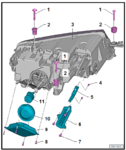
1.1.2 Summary of components - FULL-LED headlights
1 - Screw: ❑ 3 units, ❑ 3.5 + 0.5 Nm
2 - Hollow screw: ❑ Adjusting element for exact position adjustment of the headlight in the body
3 - Headlight housing
4 - Screw: ❑ 2 units, ❑ 1.5 Nm
5 - LED module for fog light and cornering light
6 - Cover: ❑ Servicing solution when replacing the LED module for fog lamps and cornering light
7 - Screw: ❑ 3 units, ❑ 1.5 Nm
8 - Screw: ❑ 4 units, ❑ 1.5 Nm
9 - Power output module 1 for left LED headlight - A31-
❑ or power output module 1 for right LED headlight - A27-
❑ to control the LED dipped beam, full beam and daytime running light functions
10 - Cover
❑ Service solution when replacing the control motor for headlight range control
11 - Headlight range control motor
1.2 Removing and installing headlight
Removing
– Switch off the ignition and all electrical components.
– Remove the front bumper ⇒
* Front bumper; removing and installing bumper .
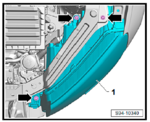
– Remove screws -arrows-.
– Carefully push the headlight -1- towards the front, unlocking and disconnecting the plug as you do so.
Installing
Installation is performed in the reverse order, pay attention to the
following points:
– Align the headlight according to the contours of the vehicle
body (maintain the gap size ⇒ Body Repairs; Rep. gr. 00 ) and
loosely tighten with screws.
– Install the front bumper ⇒
* Front bumper; removing and installing bumper .
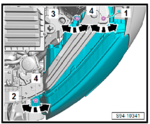
– By turning -arrow- the setting elements -4- (Does not apply to
the element with screw -1-) the headlamp is moved and is also
fitted to the surrounding body parts as a result.
– Then tighten fixing screws -1- and -2-.
– Swivel the bottom part of the headlight as far forward in the
direction of the bumper as possible and tighten screw -3-.
– Set up the headlight ⇒ “1.3 Setting the headlight beam”
Specified torques

1.3 Setting the headlight beam
Use a headlight beam setting device for setting the headlight
beam. Specified values, setting elements, conditions and measurement
⇒ Maintenance ; Booklet Karoq .
* Removing and installing bumper
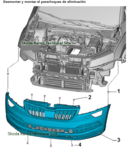
- Retire el revestimiento del arco de la rueda delantera
- Desatornille los tornillos -1-.
- Desenroscar los tornillos -2-.
- Aflojar los tornillos -4-.
- Retire el parachoques delantero de las partes de guía en el lado izquierdo y derecho del ala debajo de los faros.
- Separe el parachoques de los rieles laterales. - Junto con el asistente, retire el parachoques delantero -3- del vehículo sin distorsiones
- Desconecte los conectores de todos los componentes eléctricos disponibles.
- Desconecte las mangueras de la lavadora (si está equipado)
Después de reemplazar el parachoques para vehículos con control de crucero adaptativo, realice la instalación básica y la codificación. Si se instala el parachoques anterior, la instalación básica no es necesaria.
